Yes, riders can repair motorcycle tires with inner tubes patches. Safety and reliability depend on the repair method and the condition of the inner tube. Many people trust products like SUNSOUL tire repair compound because they are durable and easy to use. Riders often seek quick repair solutions to get back on the road. Using the right repair compound and following simple steps can help them get back on the road with confidence.
Key Takeaways
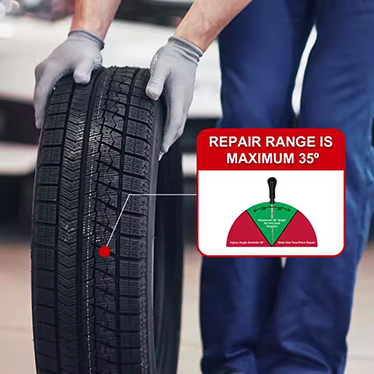
- Riders can repair small holes in motorcycle inner tubes. The hole diameter should be less than 6 mm. The damage must be in the tread area. Do not repair near the valve stem.
- Use a high-quality repair compound, such as SUNSOUL tire repair compound. This will ensure a strong repair. Be sure to read and follow the instructions.
- After repair, check for leaks. Submerge the inner tube in water. If no bubbles appear, the repair compound is effective.
- For one day after repair, keep your speed below 50 mph. This helps the repair stabilize and ensures your safety.
- Using tire liners can prevent another blowout. Check tire pressure frequently. This will help you detect slow leaks early.
Is It Safe to Patch a Motorcycle Tire?
Patching motorcycle inner tubes is generally safe, but riders need to understand when patching is most effective and what the risks are. Many riders want a quick fix, but safety should always come first. Let’s look at the right time to patch a tire and what to be aware of.
When to Patch a Tube
Riders usually patch tires when they find small punctures. However, not all small holes or cuts are suitable for patching. Here are some situations where patching is appropriate:
- Small punctures, usually no larger than 6 mm, can be safely patched.
- The puncture is located in the tread portion of the tire, which covers approximately 75% of the tread.
- The puncture is not near the valve stem.
- The largest possible patch size can be used to cover the puncture.
- The inner tube is not too old and has not been patched multiple times.
Patches are suitable for minor damage. Riders should always check the size and location of the puncture before starting a patch. Many people use patches as a temporary solution, especially when the tire pressure is low. When used properly, tire patches can last for years, even at medium to high tire pressures.
Tip: Riders should avoid repairing long cuts or damage near the valve stem. These areas are more difficult to seal and may not withstand pressure.
Risks and Limitations
Repairing inner tubes carries several risks. Riders need to be aware of these risks before hitting the road.
- Riding a repaired inner tube at high speeds can be dangerous. Improper repair can lead to failure and accidents.
- Improper repairs can mask internal damage. Moisture and debris can seep in, causing slow leaks or even a blowout.
- Using only an internal patch can create a weak point. This area can bend and heat up, causing the inner tube to become unstable or leak suddenly.
- The reliability of a repaired inner tube depends on the quality of the repair. A high-quality patch, if used properly, can last as long as a new inner tube. If used improperly, a patch can fail quickly.
Riders should always check the repair and closely inspect the repaired inner tube. If any leaks or instability are found, replace the inner tube immediately.
Note: A properly applied patch can give a tube new life. Still, riders should never ignore signs of trouble. Safety matters most.
Tools for Motorcycle Tire Repair
Essential Tools and Materials
Motorcycle riders need the right tools to repair tires. Mechanics say some basic tools can make repairs easier and safer. Many riders keep these tools in their garages or toolboxes for emergencies.
| Tool | Purpose |
|---|---|
| Scuffer or sandpaper | Makes the tube rough so patches stick better |
| Variety of patch sizes | Fits different holes or damage |
| Vulcanizing fluid | Helps patches stay on for a long time |
| Inflation method | Puts air back in the tire after patching |
| CO2 cartridges/compressor | Fills the tire quickly after fixing |
Tire pry bar for removing the tire bead. Valve tool for quickly deflating. Riders can use a clean cloth and alcohol to clean the damaged area. Talcum powder can prevent the inner tube from sticking to the tire. These tools make tire patching easier and help prolong the repair’s effectiveness.
Tip: Mark the hole before you start. Clean and roughen the spot so the patch sticks well. Put on glue, let it dry, and press the patch down firmly.
Choosing a Tire Patch
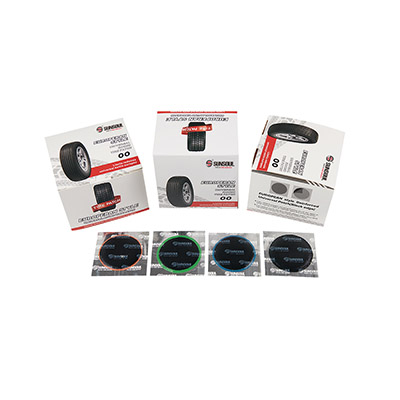
Choosing the right tire patch is crucial for repairing motorcycle tires. SUNSOUL tire patches are a reliable choice. Riders love SUNSOUL for its ease of use and excellent reputation. Tire patches come in chemical-curing and dual-curing types. Chemical-curing patches use glue for bonding. Dual-curing patches combine glue and heat for a faster and stronger repair.
| Feature | Dual Cure Tire Patch | Traditional Tire Patch |
|---|---|---|
| Curing Process | Uses chemicals and heat for quick bonding | Uses heat only |
| Durability | Tested to last in tough conditions | Durability changes |
| Application Time | Takes 5 to 15 minutes | Takes longer |
| Versatility | Works for many kinds of vehicles | Not as versatile |
| Warranty | 24-month repair warranty | Warranty changes |
SUNSOUL patches feature a separate backing for easy application. Riders appreciate our after-sales support, including training and quick assistance. The robust vulcanizing compound ensures tire safety even at high speeds. SUNSOUL helps riders get back on the road quickly and with peace of mind.
How to Patch a motorcycle Tube
Repairing a motorcycle tire with an inner tube may seem tricky, but anyone can do it with the right steps and a little patience. This guide will explain the entire process in detail, helping riders get back on the road quickly and safely.
Remove the Wheel and Tube
First, prepare your motorcycle for repairs. Park the motorcycle on a stable, flat surface, using a stand if possible. For safety, riders should wear gloves and goggles.
- Completely deflate the tire. Ensure there is no air left in the inner tube. This makes it easier to remove the inner tube.
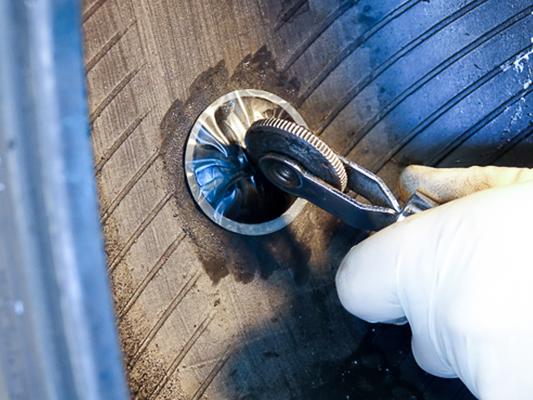
- Use a tire pry bar to push one side of the tire bead towards the center of the rim. Repeat this for the other side of the tire bead.
- Carefully remove the tire from the rim. Be gentle to avoid damaging the inner tube.
- Gently remove the inner tube from the tire. Set it aside for inspection.
Tip: Keep all tools nearby. Riders often use pliers, a valve stem tool, and a clean rag during this step.
Find and Prepare the Puncture
Locating the exact location of the leak is key to a successful repair. Sometimes, small holes are hard to spot.
- Slightly inflate the inner tube. Immerse it in a basin of water and slowly rotate it. Observe for air bubbles—bubbles indicate where air is escaping.
- Mark the puncture with a pen or marker. Draw an “X” over the hole for easy location later.
- Dry the inner tube thoroughly. Wipe it dry with a towel or let it air dry.
- Roughen the area around the puncture with sandpaper or a sander. This helps the glue adhere better.
- Wipe away all rubber dust. Make sure the area is clean and dry.
Checking for leaks in water is a simple way to spot even the smallest holes. Riders should always double-check before moving on.
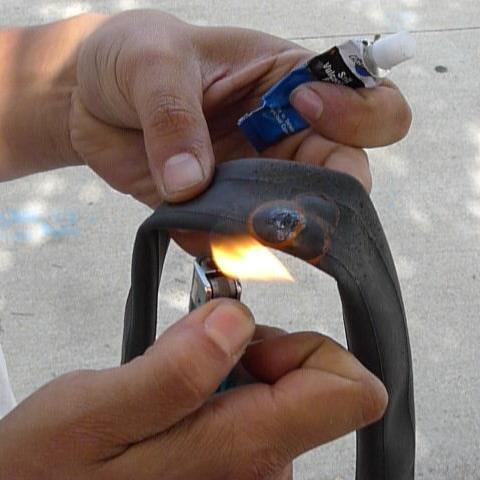
Apply the Patch
Now it’s time to repair the small hole. A suitable patch and careful application are crucial.
- Apply a thin, even layer of vulcanizing adhesive to the sanded area. The area covered should be slightly larger than the patch.
- Wait a few minutes until the glue feels viscous but not wet.
- Peel off the backing of the tire patch. Attach it directly to the marked position.
- Press the patch firmly. Smooth out any air bubbles with a sewing tool or your fingers.
- Let the patch sit for a few minutes. This helps it adhere firmly.
If the patch is applied well, its reliability can rival that of a new inner tube, especially if the inner tube is not too old or has not been repaired many times before. For best results, riders should always follow the instructions on the tire repair kit.
Reinstall and Inflate
After repairing a motorcycle tire, it is important to check the repair before reassembling.
- Slightly inflate the inner tube. Dip it in water again and check for air bubbles. If there are no air bubbles, the patch is not leaking.
- If possible, let the inner tube sit at room temperature overnight. Check for leaks the next morning.
- If the patch is secure, reinstall the partially inflated inner tube into the tire.
- Reinstall the tire onto the rim. Make sure the inner tube is not twisted or compressed. Inflate the tire to the recommended pressure.
- Reinstall the wheel on the motorcycle and secure it.
Repairing a motorcycle tire this way helps riders avoid getting stuck. Always check tire pressure before riding.
Repairing a motorcycle tire with an inner tube is a skill every rider should master. Repairing motorcycle tires or performing inner tube repairs can save time and money. If the rider carefully repairs the inner tube and uses a high-quality tire patch, the repair can last a long time. Repairs are most effective when the inner tube is in good condition and the patch is used correctly.
After Patching a Motorcycle Tire
Safety Checks
After repairing, riders should always check the repair before setting off. A few simple steps can greatly improve safety:
- Let the vulcanizing adhesive thicken before applying the patch. This helps the patch adhere firmly.
- Only repair small holes. Larger holes require professional repair.
- Never use an inner tube instead of a proper tire repair.
- Limit speed to 50 mph (approximately 80 km/h) for 24 hours after repair. This allows the repaired area time to stabilize.
- Check tire pressure after the tire has cooled, especially after the first ride or if a leak is suspected.
Tip: Riders should always check tire pressure at least three hours after the tire has cooled. This helps detect slow leaks early.
Patch Longevity
A properly used patch can last as long as a new inner tube. The quality of the patch and how it is used are crucial. Riders often find that a high-quality patch can last up to 1000 kilometers. If the patch is used improperly or is of poor quality, the repair may only last a few months. Riding conditions also have a significant impact. Rough surfaces or sharp objects will shorten the lifespan of any patch.
Preventing Future Flats
Riders can take several steps to avoid future blowouts. Using tire liners, such as Tannus Armor, adds an extra layer of protection against sharp objects puncturing the tire. These liners help prevent thorns and stones from piercing the inner tube. Slightly inflating the inner tube before reinstalling it helps prevent pinching. This simple step allows the inner tube to better fit the tire and move freely. Some riders use sealant or aerosol for added protection.
Note: Sealants and fillers help with small punctures, but they cannot replace a proper repair for bigger damage.
Repairing motorcycle tires with an inner tube is safe using the right tools and following simple steps. High-quality products like SUNSOUL tire repair compound work well because they use globally trusted, robust materials. Riders should repair small punctures in tires, but if the damage is severe or requires multiple repairs, the inner tube should be replaced. Learning how to repair tires, knowing when repairs are needed, and using the right tools can make riding safer and more reliable.
- 68% of road tire problems are caused by using inferior repair tools.
- Stainless steel, natural rubber, and brass-tipped plugs can improve repair results.
- Quickly repairing tires in the field requires good repair skills.
- Knowing your tools and repair steps is crucial.
- Small punctures can be repaired; severe damage requires a new inner tube.
FAQ
How many times can an inner tube be repaired before it needs to be replaced?
Most cyclists only repair their inner tubes once or twice. Repairing it more than three times increases the risk of a puncture. If the inner tube feels fragile or has too many repair marks, the cyclist should replace it.
Can any patch repair an inner tube?
Not all patch patches are suitable for inner tubes. Cyclists need to use patches specifically designed for inner tubes. SUNSOUL patch patches are ideal for inner tubes. Using the wrong patch can lead to leaks or make the inner tube unsafe.
What causes an inner tube to puncture after repair?
An inner tube can puncture if the patch doesn’t adhere properly or if there is hidden damage. Cyclists sometimes overlook small holes. If the inner tube is old, it may develop cracks or leaks even after repair.
Can I ride at high speeds after repairing an inner tube?
Avoid high-speed riding after repairing an inner tube. The patch needs time to adhere. Check the inner tube for leaks before riding at high speeds. Safety first.
How can I tell if a patch on an inner tube is leaking?
The cyclist inflates the inner tube and then submerges it in water to check for air bubbles. If no bubbles appear, the patch is leaking. They should also check for slow leaks. A good patch ensures the inner tube’s strength.
Tip: Cyclists should always carry a spare inner tube and tire repair kit. This helps them quickly repair inner tubes and ensures safe riding.