A flat tire can ruin your bike ride, turning a great day into a long walk home.
Mechanical issues are a common reason cyclists get stranded. The difference between being stuck and a quick repair is having the right tools.
This guide cuts through the noise. It reveals the five non-negotiable features your bike tire tube repair kit must have. A quality bike tire repair kit makes fixing a flat tire simple. Your bike inner tube repair kit ensures you can complete the repair and get back on the road with confidence.
Feature 1: High-Quality Patches for a Lasting Repair
The patch is the heart of your bike tire repair kit. A low-quality patch will fail. This failure leaves you with a second flat tire and a long walk. The patch must create a permanent seal to handle the pressure and heat of a ride. A good repair depends on a great patch.
Why Patch Quality is Non-Negotiable
You need a patch that bonds permanently to the tube. A weak patch cannot withstand road vibrations or temperature changes. It will peel away from the tube, causing a slow leak or a sudden flat. This makes patch quality one of the most critical features of any repair kit. A reliable patch gives you confidence. You can trust your repair to get you home safely after a puncture. A durable patch turns a ride-ending puncture into a minor delay.
Glueless vs. Vulcanizing Patches
You have two main choices for a tire patch: glueless and vulcanizing. Each has a specific purpose. Glueless patches are fast for temporary fixes. Vulcanizing patches create a stronger, permanent repair. Understanding the difference helps you choose the right patch for your inner tubes.
Patch Comparison: A Quick Breakdown This table shows the key differences to help you decide.
| Feature | Glueless Patches | Vulcanizing Patches |
|---|---|---|
| Durability | Temporary fix, can fail with heat. | Permanent bond, highly reliable. |
| Application | Simple peel-and-stick. | Requires cement and drying time. |
| Best Use | Quick roadside repair to get home. | Permanent, long-term puncture repair. |
| Adhesion | Pressure-sensitive adhesive. | Chemical vulcanization process. |
What Makes SUNSOUL Patches a Top Choice?
SUNSOUL designs its patches for ultimate reliability. They provide a permanent solution to a puncture, not just a temporary fix. The quality of these patches ensures your tire repair holds up under pressure. They use superior materials and advanced adhesion technology for their inner tubes patch products.
Key features include:
- Superior Material: SUNSOUL uses a high-quality natural rubber. This material offers 20% more tear resistance than common synthetic options, ensuring a durable puncture repair.
- Strong Adhesion: The vulcanizing gum creates a powerful chemical bond with the tube. This bond is leak-proof and permanent.
- Temperature Resistance: The adhesive works effectively in a wide temperature range, from -40°C to 100°C. Your patch will not fail in extreme hot or cold weather.
These elements combine to create a patch you can trust for any tire puncture. A SUNSOUL kit gives you the peace of mind that your flat tire repair is built to last.
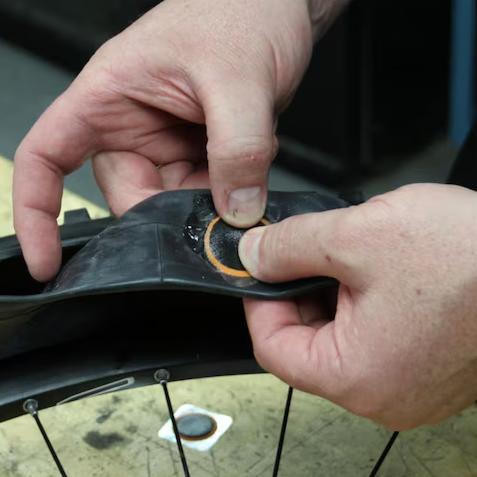
Feature 2: The Scuffer – Your First Step to a Secure Bond
A patch and adhesive are useless without proper surface preparation. The scuffer is a small but mighty tool in your repair kit. It is the key to a successful tire repair. You use this tool to rough up the surface of the tube around the puncture. This simple action creates the perfect foundation for a permanent bond. Skipping this step is the number one reason a patch fails, leaving you with a second flat tire.
Why Proper Tube Preparation is Critical
Think about painting a glossy surface. You must sand it first so the paint can grip. The same principle applies to your inner tubes. A new tube has a very smooth surface, often coated with a mold-release agent from the factory. This slick surface prevents adhesives from bonding correctly. Your patch will peel off if you apply it to an unprepared tube.
A scuffer removes the smooth outer layer and creates a textured, clean area. This texture gives the adhesive something to grab onto, forming a much stronger mechanical and chemical bond. A proper repair depends on this crucial step. It ensures your patch stays put, your tire holds air, and you can ride with confidence. A good repair starts with a well-scuffed tube.
What to Look For in an Effective Scuffer
Not all scuffers are created equal. Many cheap kits include a tiny, flimsy piece of sandpaper that is difficult to use and wears out after one repair. An effective scuffer makes the job easy and reliable.
Anatomy of a Great Scuffer 📝 Your kit should include a scuffer with these features for the best results on your inner tubes:
- Effective Abrasive Surface: Look for a metal rasp or a piece of high-grit, waterproof sandpaper. A metal rasp is more durable and provides an excellent texture for the tube.
- Sufficient Size: The tool should be large enough to hold comfortably. This gives you better control as you prepare the area for the patch.
- Durability: A quality scuffer should be reusable. A metal version will last for years, making your kit a long-term investment for any flat tire situation.
A weak scuffer compromises your entire repair. A strong, effective scuffer ensures every patch has the best possible chance to create a permanent seal on your tire.
Feature 3: Strong Tire Levers in Your Bicycle Tire Repair Kit

Your tire levers are the tools that separate the tire from the rim. A good set makes the job easy. A bad set can turn a simple flat repair into a major headache. The strength and design of your levers are crucial components of a reliable bike tire repair kit.
Why Weak Levers Are a Liability
Imagine you are on the side of the road, trying to fix a flat tire. You hook the lever under the tire bead and pull. Suddenly, the cheap plastic snaps in your hand. Now you are stuck with a broken tool and a tire that is still on the rim. Weak levers are a huge liability. They not only break under pressure but can also damage your expensive wheel rim or even pinch the new tube during installation. This can cause a second puncture before you even finish the first repair. A flimsy lever in your kit makes your entire setup unreliable.
Essential Design Features for Tire Levers
A great tire lever is more than just a piece of plastic. You should look for specific features that make the repair process smoother and safer for your bicycle.
Lever Checklist: What to Look For ✅
- Strong Material: Top brands use advanced materials. Some use a proprietary plastic composite blend for strength. Others use innovative options like recycled carbon fiber. These materials prevent the lever from bending or snapping when you need it most.
- Smart Design: A well-designed lever has a thin, scooped tip to easily slide under the tire bead without damaging the tube. Many also include a spoke hook. This feature lets you hook the first lever to a spoke, freeing your hands to work with a second lever.
- Good Grip: Features like structured thumb grooves give you better control and leverage. This helps you handle a tight-fitting tire more effectively.
Some levers are specifically designed for modern tubeless tires, while others work best on looser-fitting combinations. Your bike tire repair kit needs levers that are strong, well-designed, and suited for your specific tire and rim setup.
Feature 4: Reliable Adhesive in Your Bicycle Inner Tube Repair Kit
The adhesive in your bike inner tube repair kit is the catalyst for a successful repair. It is not just glue; it is a chemical agent designed to create a permanent bond. A dried-up or weak adhesive means your patch will fail, leaving you with another flat tire. The quality of this small tube of cement is critical for a reliable puncture repair.
The Science Behind a Permanent Bond
A strong repair depends on a chemical process called vulcanization. The adhesive in a quality kit is a special rubber cement. This cement contains a mixture of natural rubber dissolved in a solvent, along with chemical accelerators like sulfur donors and zinc oxide. When you apply it to the scuffed tube, the solvent evaporates. This leaves behind the rubber and the active chemicals.
Pressing the patch onto this layer initiates a chemical reaction. The accelerators create strong cross-links between the molecules of the patch and the inner tube. This process fuses the two pieces of rubber together, creating a single, seamless piece. This chemical bond is essential for long-term patch adhesion and longevity. It ensures your repair can handle the heat and pressure of a long bike ride, preventing a repeat puncture. This is why a good bike inner tube repair kit uses vulcanizing fluid, not simple glue.
How to Check for Adhesive Freshness
Adhesive does not last forever. The solvents can evaporate even in a sealed tube, causing the cement to thicken and lose its effectiveness. The shelf life for rubber cement can range from 12 months to four years, so you should check your kit periodically.
Pro Tip: The Squeeze Test 💡 Before a ride, give your adhesive tube a gentle squeeze. If it feels hard or the contents do not move, the adhesive has likely dried out. A fresh tube will feel pliable.
Here’s how to ensure your adhesive is ready for a tire puncture:
- Check the Consistency: Squeeze a tiny amount onto a piece of scrap paper. It should be a fluid liquid, not a thick, clumpy paste.
- Mark the Date: When you buy a new bike inner tube repair kit, write the purchase date on the box with a permanent marker. This helps you track its age.
- Store It Properly: Keep your kit in a cool, dry place away from direct sunlight to maximize its lifespan.
Replacing the adhesive in your kit is a cheap and easy way to guarantee you can fix a puncture on your bike. A fresh tube of cement is your best insurance for a successful tire repair on your inner tubes.
Feature 5: A Compact and Protective Case for Your Kit
An excellent bike tire repair kit is more than just its tools; the case that holds them is a critical component. A good case protects your repair essentials from damage and the elements, ensuring they are ready to use when you need them most. It keeps everything organized, so you are not fumbling for a patch or lever on the side of the road. The case transforms a loose collection of items into a reliable, grab-and-go solution.
Why the Case Itself is an Essential Feature
The case for your repair kit is not just packaging. It is a vital piece of equipment that ensures the reliability of your tools. A flimsy box or a simple plastic bag offers little protection. Your scuffer can get lost, your adhesive tube can be punctured by your levers, and everything can get soaked in a sudden downpour. A well-designed case prevents these problems. It keeps your patches clean, your adhesive tube intact, and all your tools organized in one place. This protection guarantees that when you have a flat tire, your kit is in perfect working order. The case provides durability for your entire setup, making it an essential on-the-go kit for any bike ride.
Key Characteristics of a Great Case
When evaluating a compact bike inner tube repair kit, pay close attention to the case itself. The best cases share several key features that enhance their functionality and durability. A compact design is crucial, as it must fit easily into a saddlebag or jersey pocket without adding unnecessary bulk. However, compact size should not compromise protection.
Case Check: What Makes a Great Container? 🛡️ A superior case combines a compact profile with robust construction. Look for these specific features to ensure maximum durability and protection for your tire repair tools.
- Impact Resistance: Hard-shell cases offer excellent protection against drops and impacts, safeguarding the contents of your kit.
- Waterproofing: A case made from waterproof materials is best for durability. This keeps your patches and adhesive dry and effective, even in wet conditions. Materials like premium 600D TPU with heat-sealed construction provide excellent water resistance.
- Secure Closure: A strong latch or a high-quality zipper prevents the case from accidentally opening and spilling its contents while you ride.
- Organization: Internal dividers or straps keep your tools from rattling around. This organization protects the delicate adhesive tube and makes finding what you need for a tire repair quick and easy.
A case with these features ensures your tube repair kit is always ready for action.
Bonus Feature: Reliable Inflation (Pump vs. CO2)
After you repair a tube, you need to inflate your tire. Your repair kit is incomplete without a reliable way to get air back into the tire. You have two main choices: a traditional mini-pump or a CO2 inflator. Both get the job done, but they work very differently.
The Portability of a Mini-Pump
A mini-pump is a cyclist’s most dependable inflation tool. You can use it over and over again, making it a great one-time investment. These pumps are compact and can easily attach to your bicycle frame or fit in a jersey pocket. The main benefit is their unlimited use; as long as you can pump, you can inflate your tire. However, not all pumps are the same. Pumps for mountain bike tires move a high volume of air at low pressure. Pumps for road bike tires move less air but can reach much higher pressures.
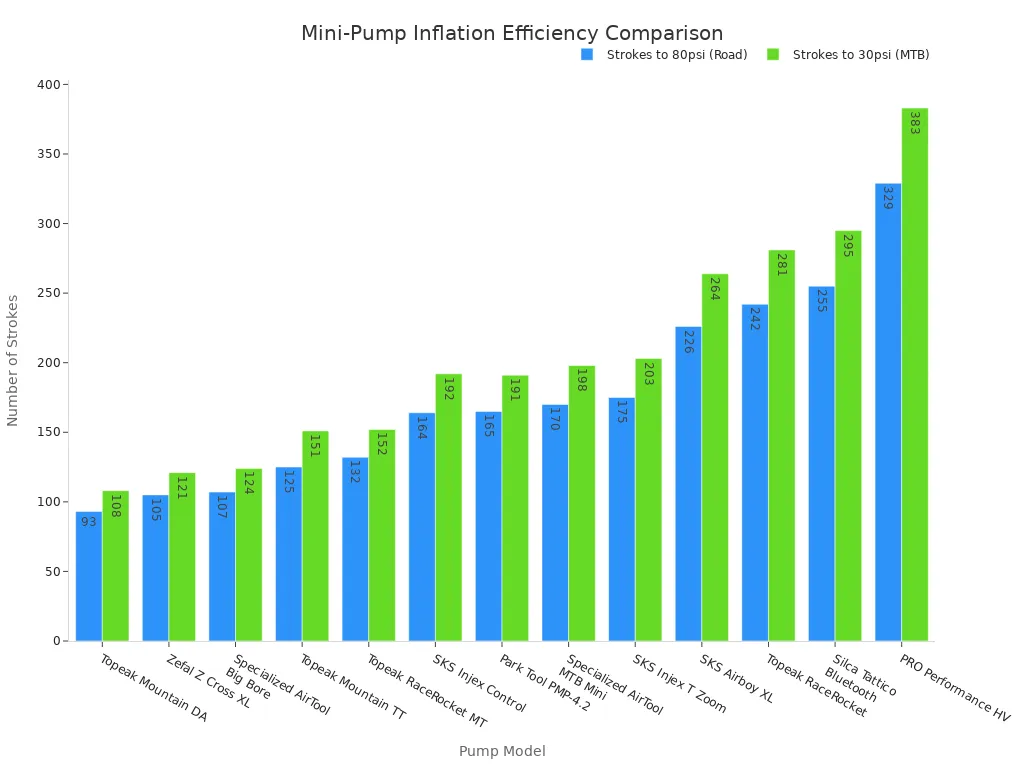
This chart shows how many strokes different pumps take to inflate a tire. Fewer strokes mean a faster repair.
The Speed of a CO2 Inflator
A CO2 inflator offers incredible speed. It can inflate a tire in just a few seconds, getting you back on the road almost instantly. This makes it a favorite for racers or anyone who values a quick fix. The system uses a compact inflator head and a single-use cartridge of compressed carbon dioxide. The entire setup is extremely compact and lightweight.
A Note on CO2 Cartridges ♻️ The leading manufacturers state that their CO2 cartridges are made from 100% recycled steel and are fully recyclable. You can place empty cartridges in your recycling bin with other metal cans.
The main drawback is that each cartridge is good for only one use. If you make a mistake or have a second flat, you might be out of luck without a backup.
Which Inflation Method is Right for You?
Choosing between a pump and CO2 depends on your priorities. Do you value speed or reusability? This table breaks down the key differences to help you decide what to include in your kit.
| Feature | Mini-Pump | CO2 Inflator |
|---|---|---|
| Inflation Speed | Slower, requires manual effort | Very fast, inflates in seconds |
| Ease of Use | Simple process, very forgiving | Requires practice to avoid waste |
| Reusability | Unlimited uses | Single-use cartridges |
| Best For | General preparedness, long rides | Racing, quick flat tire repair |
| Portability | Compact, mounts to frame | Extremely compact, fits in pocket |
For ultimate preparedness, some cyclists carry both. A CO2 inflator provides a quick way to fill a new tube, while a compact mini-pump serves as a reliable backup. This ensures you can handle any tire inflation need on your bike.
Assembling the Ultimate Bike Tire Tube Repair Kit
You need a reliable way to fix a flat tire. You can assemble your own bike tire repair kit or buy a pre-made one. Building your own kit gives you control over every component. You can select your favorite repair tools. However, buying a complete bicycle tire repair kit from a trusted brand often provides better value and convenience. The best puncture repair kits are designed by experts.
Building from Scratch vs. Buying Pre-Made
Creating your own kit lets you customize it. You pick every patch and lever. This approach can be costly and time-consuming. A pre-made bike inner tube repair kit offers a simpler solution. The best puncture repair kits save you time and research.
A quality pre-made kit offers several advantages:
- Convenience: You get everything you need for a tire repair in one package.
- Lower Upfront Cost: Buying a bundle is often cheaper than purchasing each item separately.
- Complete System: The kit includes a case and a full array of tools for a successful repair.
Many puncture repair kits are available. The best puncture repair kits ensure all parts work together. This makes your repair process smooth. Many puncture repair kits are designed for ease of use. The best puncture repair kits are a smart choice for most cyclists.
Why a SUNSOUL Kit Offers a Complete Solution
A SUNSOUL bike inner tube repair kit provides a professional-grade solution. These are some of the best puncture repair kits available. The company focuses on creating a complete system for a reliable tire repair. The bike inner tube patch kit includes a non-flammable, natural rubber-based vulcanizing cement for a safer repair. Its cold patch technology creates a strong chemical bond with the tube without needing heat. The best puncture repair kits include quality adhesive. This bike tire repair kit is also RoHS certified, ensuring it is safe for you and the environment. Many puncture repair kits do not offer this level of safety.
This table shows why a SUNSOUL bike inner tube repair kit stands out among puncture repair kits. The best puncture repair kits share these qualities.
| Feature | SUNSOUL Advantage |
|---|---|
| Patch Material | Natural rubber, vulcanizing gum |
| Adhesion | Strong, leak-proof |
| Safety | RoHS certified |
| Technology | Cold Patch, no heat needed |
| Packaging | Aluminum can with secure lid |
Choosing a SUNSOUL kit means you are getting one of the best puncture repair kits for your bike. It ensures every tire and tube repair is dependable. Many puncture repair kits cannot match this quality.
Your ride’s reliability depends on your preparation. A top-tier bike tire repair kit is not a luxury; it is fundamental gear. Your bike inner tube repair kit must have five core features for a successful tire repair.
- A superior patch for the tube
- An effective scuffer
- Strong tire levers
- Fresh adhesive for the patch
- A durable case for the kit
A single flat tire repair at a bike shop can cost between $26 and $35. Your bike tire repair kit pays for itself with one use.
Inspect your current bike tire repair kit. Invest in a complete solution. Ride with the confidence that your bike tire repair kit prepares you for any tube or patch repair.
FAQ
How long should I wait for the adhesive to dry?
You should let the vulcanizing cement dry for 3-5 minutes before applying the patch. The surface will change from glossy to matte. This change shows the solvents have evaporated. This step is critical for creating a strong, permanent chemical bond on your tube.
Can I use a glueless patch for a permanent repair?
Note: Glueless patches are for temporary fixes only.
They provide a quick solution to get you home. Heat and pressure from riding can cause them to fail over time. You should use a vulcanizing patch and cement for a reliable, long-term repair.
How often should I replace my repair kit?
You do not need to replace the entire kit. However, you should check your adhesive tube every six months. Give it a gentle squeeze. If it feels hard, the cement has dried out. Replacing the adhesive is a cheap way to ensure your kit works when you need it.
What makes SUNSOUL patches different?
SUNSOUL patches use high-quality natural rubber for excellent tear resistance. Their vulcanizing gum creates a permanent, leak-proof bond. They are also RoHS certified. This means they are tested to be free of specific hazardous materials, making them a safer choice for your repairs.