You can upgrade your bike with tubeless ready tires for better performance. A successful conversion depends on your mountain bike tubeless tire kit. Your bike kit must have five essential features. These features ensure your bike tires seal correctly and stay reliable on the trail.
Tip: For a great bike ride, check that your kit includes these five items:
- High-Quality, Long-Lasting Sealant
- Durable, Correctly Sized Rim Tape
- Reliable Presta Valves with Removable Cores
- A Valve Core Removal Tool
- A Trailside tubeless bike tire repair kit
Feature 1: High-Quality Sealant
The sealant is the heart of your tubeless bike setup. It is the liquid that coats the inside of your tire. Its main job is to plug a puncture before you get any flats. A high-quality sealant has two key features: it must plug a puncture quickly and last a long time inside your bike tire.
Puncture Sealing Power
A good sealant acts fast to plug a puncture. When your tire gets a hole, the air pressure forces the sealant into the opening. Most bike sealants are latex-based. This liquid contains tiny sealing particles, like microfibers or crystals. These particles rush to the puncture and physically plug the hole. The liquid latex then surrounds these particles and solidifies to create a permanent plug. This process must happen in seconds to prevent significant air loss.
The best sealants can plug a puncture up to a certain size, keeping your ride going. The ability to plug a puncture is one of the most important features of any tubeless system. A sealant’s job is to plug a puncture, plug it fast, and plug it for good. You need a formula that can reliably plug a puncture on the trail.
Longevity and Climate Suitability
Sealant does not last forever. The liquid base evaporates over time, which reduces its ability to plug a puncture. Your local climate greatly affects how long your sealant lasts.
- Hot, Dry Climates: Heat makes the sealant dry out faster. You may need to refresh your sealant in less than three months.
- Cool, Humid Climates: Sealant lasts longer in these conditions. You might get half a year or more before needing a top-up.
Pro Tip: Avoid using CO2 inflators for a trailside fix if possible. The rapid cooling from expanding CO2 gas can cause a “thermal shock.” This shock can make latex sealant ball up and become useless, failing to plug a puncture. If you must use CO2, plan to replace the sealant in your bike tire soon after.
Choosing a sealant with the right features for your bike and riding conditions ensures you have reliable puncture protection. This quality is what allows you to plug a puncture and keep riding.
Feature 2: Durable and Correctly Sized Rim Tape
Rim tape is the unsung hero of your tubeless bike setup. You apply this special adhesive tape to the inside of your rim. Its job is to make the rim airtight by sealing the spoke holes. The two most important features of tubeless tape are its durability and its width. Getting these right is crucial for a successful tubeless tape job.
The Importance of Material
You need a tape that can reliably plug every spoke hole. While tapes come in different materials like plastic or cloth, the thickness is more important than the material itself. A tape that is too thick can make mounting your bike tire impossible. It fills up the center channel of the rim, leaving no space for the tire bead to sit. This prevents you from getting the tire onto the rim.
For a good setup, you should choose a tape that is thin but very strong. This ensures it has the durability to handle high air pressures without stretching or failing. A quality tape will plug the spoke holes without interfering with tire installation. These features make the entire process much easier.
Choosing the Correct Width
Choosing the correct tape width is critical for a leak-free seal. If your tape is too narrow, it will not fully plug the spoke holes, allowing air and sealant to leak out. If the tape is too wide, it can ride up the sides of the rim and prevent the tire from seating correctly. An improper tubeless tape job will fail to plug the rim bed.
A simple rule helps you find the right size. Your tubeless tape should be just slightly wider than the internal width of your bike rim. This ensures the tape can plug the spoke holes and conform to the rim’s shape. For most rims, choosing a tape that is 1-2mm wider than the internal rim measurement is a great starting point. This width allows the tape to plug the spoke holes completely. A perfect fit helps plug any potential air gaps. You need it to plug the rim so your sealant can plug punctures in the tire.
This chart gives you a helpful visual guide for your bike:

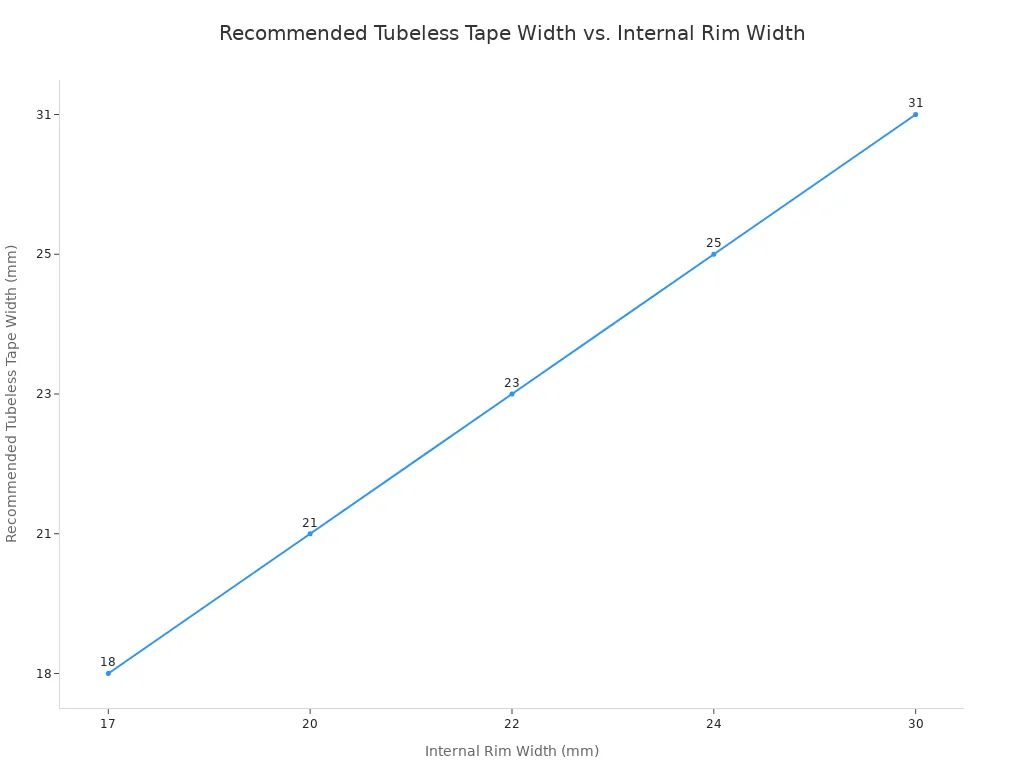
Getting the width right ensures the tape can properly plug the rim, which is the foundation of a reliable tubeless system for your bike.
Feature 3: Reliable Presta Valves
Your tubeless system is only as good as its weakest link. Reliable Presta valves are crucial for holding air and allowing easy maintenance. The best valves for your bike have two important features: a removable core and the correct size for your rims. These elements add significant value to your tubeless setup.
Why Removable Cores Are Essential
A removable valve core is a non-negotiable feature for any tubeless bike. The core is the small, threaded pin inside the valve that you press to release air. Over time, tubeless sealant can dry inside this tiny mechanism. This creates a clog that can make adding air difficult or impossible. A clogged valve can stop you from fixing a pressure issue on the trail.
Having a removable core lets you solve this problem easily. You can use a small tool to unscrew the core for cleaning or replacement. This simple ability offers huge benefits:
- You can inject sealant directly into the tire, which is faster and cleaner.
- It allows you to use thicker sealants with larger particles that plug punctures more effectively.
- You can remove old sealant before changing a tire, reducing mess.
A removable core helps your sealant do its job and lets you plug any maintenance issues quickly. This adds real value to your bike’s reliability.
Proper Length and Secure Base
Choosing the right valve length and base shape is essential for an airtight seal. The valve must be long enough to extend past your rim so you can easily attach a pump.
Quick Guide to Valve Length:
- Measure your rim’s depth in millimeters.
- Add at least 15mm to that measurement.
- Choose a valve that meets this minimum length.
This ensures you have enough room to work with your pump. The valve’s rubber base is just as important. It must match the shape of your rim bed to create a perfect seal and plug the valve hole. Some rims are flat, while others are curved. High-quality valve kits, like those from Orange Seal, often include different base shapes to guarantee a perfect fit for your specific bike. Brands like Peaty’s MK2 offer excellent value with multiple length options and built-in tools. A secure base is one of the most important features to prevent slow leaks from your bike tire.
Feature 4: The Essential Tools for Tubeless Tire Setup
Having the right tools makes your tubeless tire setup much smoother. You need more than just sealant and tape to get the job done right. A few key tools will help you plug any issues during installation and maintenance. These tools are designed to be easy to use and effective.
The Valve Core Removal Tool
A valve core removal tool is a small but mighty part of your kit. This tool lets you unscrew the inner core from your valve stem. Removing the core is important because it can get clogged with old sealant. A clogged core makes it hard to add air to your bike tire. The tool is easy to use and helps you plug the valve core securely.
Removing the core also creates a larger opening. This makes adding sealant with an injector much faster. A good tool has an effective capture rod to plug and hold the core so you do not lose it. This simple device makes the entire tubeless tire setup process quicker and brings great ease to maintenance. Some multi-tools for your bike even have a hidden feature for this.
One tester, Jeremy Benson, discovered an unlisted function on a chain tool: “you can use it to remove valve cores.”
Tire Levers and Sealant Injector
Your old tire levers might not work well with modern tubeless tires. A proper tubeless tire installation requires levers designed for the job. These tools are easy to use and help you work with tight tire beads.
- Modern Tire Levers: Look for levers made of super-strong plastic. Many have a special shape to help lift the tire bead without damaging your rim. Some even have a metal core with a nylon shield to protect carbon rims. These features help you plug the tire onto the rim. They are easy to use and help you plug the bead into place.
- Sealant Injector: A sealant injector is a large syringe with a tube. It lets you push sealant directly through the valve stem after removing the core. This method is much cleaner than pouring sealant into the tire. It is easy to use and helps you plug the tire with sealant without making a mess. This tool is easy to use and helps you plug the system for a perfect seal. You can plug the tire, inflate it, and get your bike ready to ride. The injector is easy to use and helps you plug the valve after adding sealant.
These tools are essential for a hassle-free experience with your bike. They are easy to use and help you plug any potential problems.
Feature 5: A Trailside Tubeless Tire Repair Kit
Your sealant is amazing, but it cannot fix every puncture. Sometimes a sharp rock or piece of glass creates a hole too large for sealant to handle. This is where a trailside tubeless bike tire repair kit becomes your most important tool. Having one in your pack gives you the confidence to tackle any trail, knowing you can handle most flats. A good tubeless repair kit offers solutions for different types of damage, ensuring you can keep riding. These repairs are often easy to use and very effective.
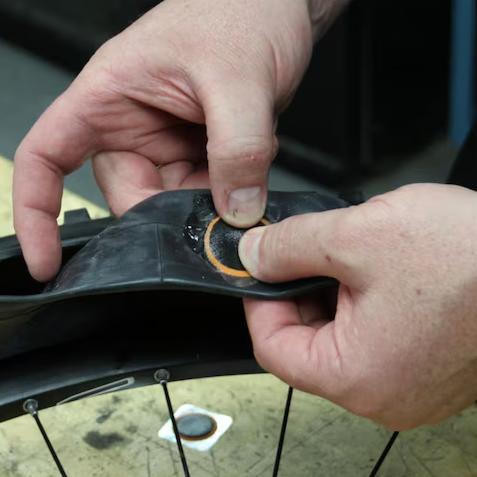
Plugs for Larger Punctures
A plug is your first line of defense against a major puncture. These are designed for quick fixes on the trail. Most tubeless tyre repair kits use “bacon strips,” which are gummy strings you force into the hole. These are easy to use and work well at the lower tire pressures common on a mountain bike. For a very large puncture, you can even twist multiple strips together.
Many of the best tubeless bike tire repair kits are compact and easy to use. The Pro Bike Tool Tubeless Repair Kit is a compact option with a case that doubles as a handle. The Muc-Off Puncture Plug Repair Kit is another compact and easy to use tubeless repair kit. These tubeless tire repair kit options make tubeless tire repair simple. A tubeless repair kit is a must-have for your bike.
| Plug Type | Best For | Downside |
|---|---|---|
| Bacon Strips | Center of tread, lower pressures (MTB) | Can work its way out over time |
| Mushroom Plugs | Tread grooves, larger voids | Can sometimes pop inward |
A good tubeless repair kit makes repairs fast. You can plug the puncture and get back to riding without worrying about flats. These compact kits are easy to use and essential for any bike ride.
Patches for Internal Repairs
While a plug is great for the trail, a patch offers a more permanent tubeless tire repair. You apply a patch to the inside of your tire. This creates a stronger, more reliable seal for repairs. Patches are the best choice for a large puncture or when you want a long-term fix to prevent flats. A bicycle tubeless tire repair kit for home use should include quality patches. These features ensure your bike is always ready.
For these permanent repairs, you need a product you can trust. Manufacturers like SUNSOUL specialize in high-quality tire patches known for their strong adhesion and durability. Their patches are easy to use and create a leak-proof seal, making them a top choice for lasting repairs. Using a reliable patch from your tubeless tire repair kit means you will not have to worry about that puncture again. This type of tubeless tire repair keeps your bike safe. A compact tubeless repair kit for the trail and a patch kit at home give you complete protection from flats. This tubeless repair kit is easy to use for permanent repairs. The compact size of a trail tubeless repair kit is great, but a patch provides a better fix for flats. The tubeless bike tire repair kit is not complete without a way to handle flats on the trail. The tubeless tyre repair kits are compact and perfect for riding.
Key Features of a Complete Mountain Bike Tubeless Tire Kit
Choosing a complete kit simplifies your transition to tubeless. The best kits bundle everything you need, ensuring all parts work together. This saves you from the headache of buying mismatched components. These key features make your tubeless tire setup a success from the start.
All-in-One Convenience
A great mountain bike tubeless tire kit offers the convenience of having every necessary item in one box. You avoid the guesswork of matching tape width to your rims or valves to your rim depth. A comprehensive package for your bike should include sealant, rim tape, valves, and essential tools. It must also contain a trailside tubeless repair kit. This all-in-one approach ensures you have a reliable tubeless repair kit for emergencies. Having a complete tubeless bike tire repair kit and setup tools in one place means you are ready for installation and your first ride. The best mountain bike tubeless tire kit even includes a tubeless repair kit for the trail. This makes getting your bike ready for riding much easier. A quality tubeless repair kit is a vital part of the package.
Clear Instructions for Success
Good instructions are one of the most valuable parts of any kit. They guide you through the process and help you avoid common mistakes that lead to failure. A successful tubeless tire repair starts with a good setup.
Avoid These Common Setup Mistakes:
- Poor Rim Tape Application: Air leaking from the valve hole often means your tape is not sealed over the spoke holes. One user’s tubeless conversion disaster showed sealant leaking from every spoke nipple after a bad tape job.
- Using a Cold, Stiff Tire: You should warm your tire in the sun first. A warm tire is more flexible and seats on the rim much easier.
- Dirty Valve Stem: Old sealant can clog your valve. You need to clean it to allow air to flow freely for fast inflation.
Clear directions help you perform a perfect installation. This prevents frustrating leaks and ensures your tubeless tire repair efforts on the trail are successful. A good tubeless bike tire repair kit will have instructions, as will a good tubeless repair kit. Following them ensures your bike is reliable. The tubeless repair kit will be your backup, but a good setup is your first defense. A tubeless repair kit is for when things go wrong, but instructions help things go right. The tubeless repair kit is an essential tool.
A great mountain bike tubeless tire kit is defined by five essential features. You need superior sealant, proper tape, dependable valves, setup tools, and a trailside tubeless bike tire repair kit. Choosing a kit with these items gives you confidence for every ride on your bike. For lasting quality, you can trust components from manufacturers like SUNSOUL. They provide reliable solutions for your bike.
SUNSOUL Quality Features:
- High-quality materials: They use strong adhesive and natural rubber for durable repairs.
- Leak-proof seals: Their patches create a strong seal to keep your bike tire airtight.
This complete mountain bike tubeless tire kit ensures your bike is always ready for the trail.
FAQ
How often should I add more sealant to my tires?
You should check your sealant every 2-4 months. Hot climates dry it out faster, requiring more frequent refills. In cooler conditions, sealant can last up to six months. Regular checks ensure your puncture protection is always ready.
Can I reuse my tubeless rim tape?
You should not reuse your rim tape. Removing the tape stretches it and weakens the adhesive. This damage prevents a reliable, airtight seal. Always apply a fresh layer of tape when changing it to avoid slow leaks.
What happens if a tubeless plug fails on the trail?
You can insert another plug if the first one fails. For a complete failure, you can remove the tubeless valve from the rim. Then, you can install a spare inner tube to get home safely.
Pro Tip: Always carry a spare inner tube, even with a tubeless setup. It is the ultimate backup plan for any major tire damage.
Do I need a special pump for tubeless tires?
A standard floor pump can often work. However, a high-volume pump or an air compressor makes seating the tire much easier. These tools deliver a fast blast of air to lock the tire bead onto the rim of your bike.