To fix a tire with a vulcanizing tire patch, you need to clean the spot first. Next, make the surface rough. Then, put on primer and cement. After that, press the patch down hard so it sticks well. The SUNSOUL Vulcanizing Tire Patch gives a strong fix for cars, trucks, bikes, and motorcycles. Vulcanized patch kits work better than regular adhesive patches. They make a lasting chemical bond that is stronger and lasts longer. These patches also handle stress better. Cold patch vulcanizing makes the repair even stronger. The table below shows how vulcanizing patches are better than adhesive ones:
Benefit | Vulcanizing Tire Patches | Traditional Adhesive Patches |
|---|---|---|
Durability and Strength | Strong chemical bond, increased durability | Weaker bond, may fail over time |
Long-Term Performance | More reliable for long-term use | Prone to failure |
Chemical Bonding | Forms a permanent chemical bond | Relies on glue |
Doing each step helps your repair last a long time.
Key Takeaways
First, clean and scratch the hole area. This helps the patch stick well and stay on longer. – Pick a patch that is the right size for the hole. The patch should cover the hole and go past it to stop leaks. – Use primer and vulcanizing cement together for a strong hold. These two things make the fix last longer. – After you put on the patch, always check for leaks. Spray soapy water on the spot to see if air bubbles show up. – Be safe while you work. Wear gloves and safety glasses to protect yourself when fixing tires.
Get ready to patch a tire with the right tools
Gather vulcanizing tire patch and supplies
You need to get all your tools and materials first. The SUNSOUL Vulcanizing Tire Patch is special because it uses strong natural rubber. It also comes with an 18-month warranty. This patch can be used on cars, trucks, bikes, and motorcycles. It is simple to use and follows USA safety rules. The table below shows why SUNSOUL patches are trusted:
Feature | Description |
|---|---|
Material | High-quality natural rubber for durability and long-lasting performance. |
Warranty | 18-month warranty indicating reliability. |
Compatibility | Designed for universal compatibility across various vehicles. |
Application | Easy to apply, requiring no special skills. |
Compliance | Complies with USA standards for quality and safety, enhancing reliability. |
You should also have a tire repair kit, a tire buffer or rasp, vulcanizing cement, a roller, gloves, and safety glasses.
Pick the right patch size for the damage
It is important to pick the right patch size. This helps make the repair safe and strong. The kind of tire and how big the hole is will help you choose. The table below gives some advice:
Tire Type | Maximum Puncture Size |
|---|---|
Fabric-ply passenger/light truck | 1/4” (6mm) |
Steel belted LT, medium/heavy-duty truck | 3/8” (10mm) |
Check if the damage is in the crown area of the tire. A tire expert should look at the tire to see if it can be fixed. Where the damage is, how big it is, and what shape it is all matter.
Follow safety steps before you start
Safety is the most important thing when fixing a tire. Make sure the tire has the right air pressure. This helps stop problems from low air or too much weight. Always take the tire off the rim to look for hidden damage inside. Only people who know how to fix tires should do the repair. They need to use the right tools and follow safe steps. SUNSOUL patches meet ISO 9001 and DOT rules. This means they are made with strict safety and quality checks.
Tip: Always work in a clean and bright place. Wear gloves and safety glasses to stay safe when using a vulcanizing patch.
Locate and mark the tire puncture area
Find the exact spot needing repair
A technician starts by finding the puncture. He looks for objects like nails or glass stuck in the tire. Sometimes, air bubbles or a hissing sound show where the hole is. He can spray soapy water on the tire and watch for bubbles. This method helps him see even small leaks. He checks the tread and sidewall carefully. If the tire is off the rim, he can inspect the inside for damage. The goal is to find the exact spot that needs repair.
Mark the area for accurate patching
After finding the puncture, the technician marks the area. He uses chalk or a tire marker to draw a circle around the spot. This step helps him remember where to apply the patch. A clear mark prevents mistakes during repair. He makes sure the mark is big enough to cover the damaged area and some of the surrounding rubber. Accurate marking helps the patch stick well and last longer.
Tip: Marking the area before cleaning or roughening keeps the repair precise. It also helps avoid missing the puncture during later steps.
Inspect for other tire damage
Before patching, the technician checks for more damage. He removes the tire from the rim to look for hidden problems. He inspects both sides of the tire for cuts, cracks, or worn spots. Sometimes, a tire has more than one weak area. He looks for bulges or signs of separation in the rubber. If he finds extra damage, he decides if the tire is safe to repair. A careful inspection helps prevent future problems and keeps the vehicle safe.
Remove the tire from the rim to check for hidden damage.
Inspect both sides of the tire for any signs of wear or damage.
A thorough check ensures the SUNSOUL Vulcanizing Tire Patch works as intended and gives a strong, lasting repair.
Prepare the surface for vulcanizing tire patch
Clean and roughen the repair area
A clean and rough surface helps the patch stick better. First, a technician wipes away dirt, dust, and any debris from the puncture area. He uses a clean cloth or brush for this step. Next, he removes any loose rubber pieces. This step keeps the area smooth and ready for repair.
He then uses a scuffer tool or sandpaper to roughen the surface. The technician creates a crosshatch pattern around the damaged spot. He makes sure to extend the roughened area about half an inch beyond the puncture. This pattern helps the vulcanizing tire patch bond tightly to the tire. The roughened surface should feel gritty and even.
Steps to prepare the area:
Locate the puncture site on the tire.
Clean the area thoroughly.
Use a scuffer tool to create a crosshatch pattern, extending half an inch beyond the damage.
Remove any loose rubber pieces.
Tip: A well-roughened surface gives the patch the best chance to hold strong and last long.
Apply primer and vulcanizing cement
After roughening, the technician applies primer and vulcanizing cement. These products help the patch form a chemical bond with the tire. SUNSOUL recommends using their GRC rubber cement for both the primer and the cement. This product works well with the vulcanizing tire patch and ensures a strong repair.
He applies a thin, even layer of primer over the roughened area. The technician waits for the primer to dry until it looks dull, not shiny. Next, he brushes on a thin coat of vulcanizing cement. He covers the entire area marked for repair. The cement should dry until it feels tacky but does not stick to his finger.
Note: Using the right primer and cement helps the vulcanizing patch create a permanent bond with the tire.
Cut patch to fit the injury
The technician selects a patch that matches the size and shape of the damage. He checks that the patch covers the puncture and extends beyond it by at least a quarter inch on all sides. If needed, he trims the patch to fit the area. He makes sure the edges are smooth and rounded. Sharp corners can lift over time, so rounded edges help the patch stay in place.
He then checks the patch against the repair area before removing the backing. The patch should sit flat without wrinkles. A good fit ensures the vulcanizing tire patch will seal the injury and keep air from escaping.
Reminder: Always use a patch that is large enough to cover the damage and some of the surrounding area. This step helps prevent leaks and keeps the tire safe.
Apply and secure the vulcanizing tire patch
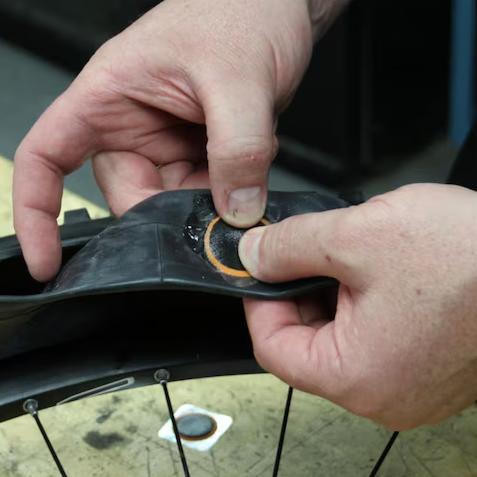
Place and press the patch firmly
A technician removes the protective backing from the vulcanizing tire patch. He centers the patch over the prepared area. He places the patch so it covers the puncture and extends past the roughened surface. He presses the patch down with steady force. This step helps the patch make full contact with the tire. The technician smooths out any air bubbles. He checks that the patch sits flat and does not wrinkle. A well-placed patch creates a strong seal.
Tip: Pressing the patch firmly helps the chemical bond form between the patch and the tire.
Use a roller for even pressure
After placing the patch, the technician uses a roller tool. He rolls over the patch in several directions. The roller applies even pressure across the entire patch. This action pushes out trapped air and helps the patch stick better. The technician rolls from the center to the edges. He repeats this step until the patch feels secure. Using a roller makes the bond stronger and helps prevent leaks.
Steps for using a roller:
Start rolling from the center of the patch.
Move the roller toward the edges.
Roll in different directions for full coverage.
Check that the patch is smooth and flat.
Allow proper curing time
The technician lets the vulcanizing tire patch cure before moving the tire. Curing means the patch forms a chemical bond with the tire rubber. Manufacturer guidelines recommend a curing time of about 10-15 minutes. The technician waits for the patch to set fully. He does not rush this step because a good cure ensures a lasting repair.
Several factors can affect curing time:
Temperature changes can speed up or slow down the process.
Pressure applied during patching helps the bond form.
The type of vulcanizing system used may change how long curing takes.
The composition of the patch and tire rubber can influence the result.
The accelerator in the cement affects how quickly the patch cures.
Note: Always follow the recommended curing time for the best results. A well-cured patch gives the tire a strong and reliable repair.
A technician checks the patch after curing. He makes sure the vulcanizing patch feels secure and does not lift at the edges. He knows that careful application and proper curing help the vulcanizing tire patch last longer and keep the tire safe.
Finish the repair and check for leaks
Reinstall and inflate the tire
After the patch cures, a technician begins to reinstall the tire. He checks that the tire seats correctly on the rim. He makes sure the tube does not get pinched between the rim and the tire. He puts the lower bead of the tire onto the wheel first. Then, he uses a tire iron to install the upper bead. He spins the wheel counter-clockwise with a tire machine. He grips the tire iron firmly to keep it safe. Next, he uses an air hose to inflate the tire to the correct pressure, usually between 35 and 40 psi. He inserts the valve stem back into the rim. For tube-type tires, he inflates the tube just enough to give it shape, lines up the valve stem, and places it through the rim hole. He installs one side of the tire bead at a time. If the last part is hard, he lets out all the air to make it easier. He avoids using tire levers to prevent pinching the tube. Once the tire is back on, he inflates it to the recommended psi found on the sidewall.
Inspect for airtight seal and leaks
A technician checks the repair to make sure the tire holds air. He sprays soapy water around the patched area and the valve stem. If bubbles appear, air is leaking. He listens for any hissing sounds. He also checks the tire for a proper seal around the rim. If the patch holds and no bubbles form, the fix a flat repair is successful. He repeats the check if needed to ensure safety.
Tip: Always check the tire pressure after repair. A steady pressure means the patch works well.
Troubleshoot common patching issues
Sometimes, problems can occur after patching. If the tire still leaks, the technician checks for missed punctures or damage. He makes sure he buffed the inside surface well before applying the patch. He also checks if he used the right amount of vulcanizing cement. Misapplied cement or patch can cause leaks. Air leakage often means the patch did not seal properly. Moisture entering the tire can cause more damage. Unsafe repair methods can lead to tire failure.
A combination repair with a patch and a rubber plug helps prevent air and moisture from getting inside the tire.
SUNSOUL vulcanizing tire patches go through strict quality checks. Each patch passes pressure resistance tests up to 300 psi and water immersion tests for 72 hours. The company uses high-quality rubber and advanced adhesion technology. SUNSOUL patches meet ISO 9001 standards and are DOT and CE compliant. These measures ensure every fix a flat repair is safe and long-lasting.
Quality Assurance Measure | Description |
|---|---|
ISO 9001 Certification | Ensures consistent production quality. |
Safety Compliance | DOT and CE marked for road safety. |
Comprehensive Testing | Pressure, water immersion, and durability tests for each patch. |
Advanced Material Technology | Specialized rubber compounds for heat and friction resistance. |
Leading Adhesion Properties | Bonding strength exceeds industry standards. |
Environmental Compliance | Meets RoHS and REACH standards, free from hazardous chemicals. |
A technician does a few steps to fix a tire safely. He puts on glue and waits for it to dry. Then, he places the patch and presses it down hard. He checks if the patch sticks well. Getting the area ready and using the right steps helps the repair work better. SUNSOUL vulcanizing tire patches are strong and last a long time. People say these patches are easy to use and very good quality. The table below shows how long each repair can last:
Repair Method | Average Lifespan | Notes |
|---|---|---|
Tire Plugs | 7-10 years or up to 25,000 miles | Temporary fix |
Patches | Can last for years | Seals from inside |
Plug-Patch | Lasts tire’s life | Most secure |
Technicians pick SUNSOUL because it gives safe and lasting repairs.
FAQ
How long does a SUNSOUL vulcanizing tire patch repair last?
A SUNSOUL vulcanizing tire patch can last for years. The patch forms a strong chemical bond with the tire. Many technicians say the repair lasts as long as the tire itself.
Can anyone use a vulcanizing tire patch at home?
A person with basic tools and safety gear can use a vulcanizing tire patch. Reading the instructions and following each step helps ensure a safe and effective repair.
What types of tires work with SUNSOUL vulcanizing patches?
SUNSOUL vulcanizing tire patches work on cars, trucks, bicycles, and motorcycles. The patches fit both tubeless and tube-type tires. Technicians choose the right size for each repair.
How can someone check if the patch sealed the tire?
Tip: Spray soapy water on the patched area. If no bubbles appear, the patch sealed the tire. Listen for hissing sounds to check for leaks.