There are many ways to repair an inner tube. Tire repair kits, inner tube patch, rubber glue, and tire boosters are common choices. Some people use household items for quick repairs. Surveys show that pressurized canned sealant, tire sealant kits, and liquid tire sealant are also commonly used tools for quick repairs. SUNSOUL tire sealant is a trusted brand that offers excellent solutions for a wide range of vehicle types. Even beginners can master these tools with a little practice.
Key Takeaways
- Choosing a high-quality tire sealant like SUNSOUL ensures a strong repair. They have good adhesion and are easy to use.
- Clean the area around the puncture before applying the sealant. This helps the sealant adhere firmly to the puncture.
- Inflate the inner tube and check for leaks to test the sealant’s effectiveness. Doing so can prevent further problems later.
- Carry a tire repair kit, a spare inner tube, and a pump with you when you ride. Being prepared will allow you to repair a blowout quickly.
- In emergencies, you can use strong adhesive tape (such as Gorilla tape) for quick repairs, helping you complete your ride safely.
Materials to Patch Tire Tube
Choosing the right material makes repairing tire inner tubes easier, ensuring your bicycle or car continues to run. SUNSOUL tire patches are a reliable choice for users seeking high-quality repairs. SUNSOUL offers a variety of types of patches, such as chemically vulcanizing patches and dual-vulcanizing patches. These patches are suitable for bicycles, motorcycles, cars, trucks, and even agricultural equipment. People trust SUNSOUL because of its durable materials and ingenious design. The company also provides rapid customer and technical support.
Patch Kits and Pre-Glued Patches
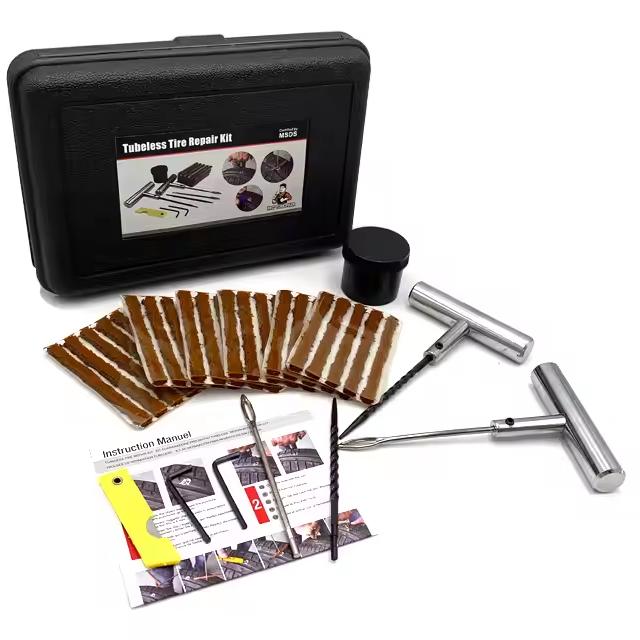
Tire repair kits and pre-applied patches are essential tools for bicycle maintenance and quick repairs. Riders often carry spare inner tubes or tire repair kits on long rides. Tire repair kits typically contain glue, sandpaper, and multiple patches. Pre-applied patches require no glue, making them very quick to use.
| Patch Type | Advantages | Disadvantages |
|---|---|---|
| Glueless | Fast, clean, good for quick fixes | Less permanent, for getting home |
| Glued | Permanent, reliable, strong chemical bond | Needs glue, can be messy, takes time |
| Type of Patch | Application Method | Longevity |
|---|---|---|
| Glue Patches | Requires adhesive to bond the patch | Can last as long as the tire itself |
| Glueless Patches | Pre-applied adhesive for easy use | Temporary, may need replacement |
People use pre-applied adhesive patches to quickly repair punctures. If a more durable repair is needed, glue-based patching is the best option.
Rubber Cement and Glue
Rubber glue is a common tool for repairing bicycle inner tubes. It helps the patch adhere to the inner tube. Most tire repair kits include rubber glue.
The vulcanization process creates cross-links in the rubber, forming a network structure of fibers that strengthens the rubber. Once the glue dries, the patch will adhere firmly to the inner tube. For best results, the repaired area must be kept clean and dry.
Rubber glue helps with patching, but it doesn’t seal punctures permanently. Riders should check the patch after riding a few times.
Tire Boots and Emergency Items
A tire patcher (also called a tire boot) can come in handy when a tire has a large puncture or sidewall damage. While it’s not permanent, it’s enough to get the rider home safely. Tire patchers are perfect for roadside emergency repairs. You can use a tubeless tire patcher, or even some makeshift items like folded dollar bills.
- Examples: Tubeless tire patchers like the Park Tool TB-2
- Other makeshift materials that can be used in emergencies
After using a tire patcher, the rider should replace the tire or inner tube as soon as possible. Carrying a tire patch kit is a wise choice for bicycle maintenance.
How to Patch an Inner Tire Tube
Repairing an inner tube is a very useful skill for anyone who rides a bicycle or drives a vehicle. This skill can help riders quickly fix a flat tire and get back on the road. The following steps will explain how to repair an inner tube using a standard tire patch kit. Proper repair techniques ensure a reliable repair and keep the tire safe for future rides.
Find and Prepare the Puncture
The first step in repairing an inner tube is locating the puncture. Riders should first slightly inflate the inner tube and then listen carefully for any hissing or whistling sounds. If the puncture is difficult to spot, hold the inner tube close to your ear or immerse it in water to see if any bubbles appear. Mark the puncture site with chalk or a marker to help remember its location.
Next, check the inside of the tire for sharp objects. Gently run your finger along the inside of the inner tube to find any glass, thorns, or metal fragments that caused the puncture. Removing these foreign objects can prevent the tire from being punctured again after repair.
Cleaning and preparing the area around the puncture is crucial. Riders can use sandpaper or the metal blade from a tire repair kit to smooth the puncture surface. This step helps the patch adhere better. The area should be clean and dry before proceeding to the next step. Some specialized tools, such as a durable hoe scraper or a tungsten carbide polishing wheel, can make this process easier, but sandpaper is sufficient for most bicycle maintenance needs.
Apply the Patch
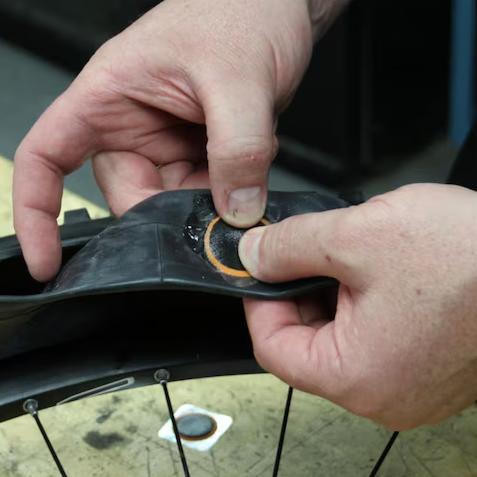
Applying tire patches requires extra care. Riders should choose patches that completely cover the puncture. For adhesive patch repairs, apply a thin layer of adhesive around the puncture, covering an area slightly larger than the patch itself. Wait a few minutes for the adhesive to thicken.
Once the adhesive is completely dry, simply peel off the edge of the patch. Aligning the patch with the center of the puncture is crucial. Press the patch firmly onto the inner tube using your thumb and forefinger, rolling and pressing to help create a strong seal. For pre-applied patches, the steps are similar, but there’s no need to wait for the adhesive to dry.
After applying the patch, never inflate the inner tube from the outside. Doing so will stretch the inner tube and weaken the adhesion. Let the patch sit for a few minutes to ensure a better seal.
Test and Reinstall
Testing the repair before reinstalling the inner tube can prevent future problems. Riders should first inflate the inner tube partially with air, then immerse it in water to check for air bubbles. If no air escapes, the patch has successfully sealed the puncture. Leaving the inner tube overnight helps confirm the repair’s effectiveness.
When reinstalling, inflate the inner tube to just the right amount to maintain its shape. Insert the inner tube into the tire, aligning the valve stem with the valve hole on the rim to ensure proper installation. Install one bead at a time, checking for any squeeze points to help prevent new punctures. After installing the tire, inflate slowly, checking for even bead coverage on the rim. Use a tire pressure gauge to ensure the tire reaches the correct pressure.
Common mistakes include: not having a sharp object inside the tire, using the wrong size inner tube, or squeezing the inner tube during installation. Carefully following each step helps avoid these problems and makes tire patching a reliable method for repairing punctures.
Tip: It’s best to practice tire patching at home before long rides. This skill is essential for safely and effectively repairing bicycles and vehicles.
Alternatives for Patching a Bike Tire Tube
Household Fixes
Sometimes cyclists need a quick fix for a flat tire but don’t have a patching kit. They can use some household items to repair bicycle inner tubes in emergencies. Many people find that for larger punctures, Gorilla Tape works well. This tape has strong adhesion and can cover larger holes, helping cyclists continue their journey. Super Glue is suitable for smaller repairs.
- Gorilla Tape can cover larger punctures and adhere firmly.
- Super Glue can temporarily seal smaller holes.
- A dollar bill or plastic wrap can be used as a tire liner in an emergency.
Note: Household item repair is best suited as a temporary solution. Cyclists should use professional tire patches or patching kits for long-lasting repairs. These quick repair methods can help cyclists get home safely but cannot replace routine bicycle maintenance.
When to Replace Instead of Patch
Sometimes repairing a bicycle inner tube won’t solve the problem. Cyclists should be aware of whether the inner tube needs to be replaced. If the inner tube is severely damaged, repairs will be ineffective. A failed repair means the inner tube cannot maintain air pressure. A damaged valve stem will also render the inner tube unusable. Riders should carefully inspect the inner tube before deciding to repair or replace it.
| Reason to Replace Tube | Description |
|---|---|
| Severe damage | Large tears or multiple holes |
| Failed patch | Patch does not seal or leaks |
| Valve damage | Bent, broken, or leaking valve |
Replacing the tube ensures a safe and reliable repair. Riders should keep spare tubes for emergencies. Proper bike maintenance helps prevent flats and keeps the bicycle in good condition.
Choosing the right repair method helps riders stay safe on the road. SUNSOUL tire sealant is known for its strong adhesion, fast curing, and ease of use. For best results, riders should follow these tips:
- Use high-quality tire sealant and clean the inner tube before repairing.
- After the sealant has completely dried, check for any other damage.
- Check the inner tube frequently and maintain the correct tire pressure.
- Always carry a tire repair kit, a spare inner tube, and an air pump for emergencies.
Adequate preparation and proper riding techniques will make every ride smoother.
FAQ
How long will a patched inner tube last?
A well-patched inner tube can last as long as a new one. Riders should regularly check the repair. Premium patching materials like SUNSOUL provide a strong and lasting seal.
Can riders use any glue to patch an inner tube?
Not all glues are suitable. Rubber glue or vulcanizing agents bond best to inner tubes. Household glues may not withstand the pressure.
What makes SUNSOUL patching materials different?
SUNSOUL patching materials are made with premium materials. These patches are easy to apply and have strong adhesion. Riders trust SUNSOUL for reliable repairs on a wide range of vehicles.
Can I ride immediately after a patch?
Riders should wait a few minutes for the patch to harden. Testing the repair before riding ensures safety. Inflating the inner tube and checking for leaks helps prevent problems.