A vulcanizing tire repair kit provides the tools for a permanent tire repair. This kit uses a chemical process. A special rubber strip and cement bond with your tire’s rubber, creating a seamless and durable seal for a puncture. A flat tire is a very common problem for drivers.
Did you know? Flat tires are responsible for nearly 20% of all roadside assistance calls, making them one of the most frequent issues drivers face.
This simple tire repair kit offers a reliable solution. You can fix a tire puncture on the spot with this kit, making the repair a permanent part of your tire.
Why a Vulcanizing Tire Repair Kit is a Smart Investment
Owning a vulcanizing tire repair kit is one of the smartest decisions you can make as a driver. This small investment prepares you for one of the most common roadside emergencies. It offers significant advantages in durability, cost, and safety.
Creates a Strong, Permanent Seal
You want a tire repair that lasts. A vulcanizing kit creates a bond that is far superior to temporary plugs. The chemical process fuses the repair strip with your tire’s rubber. This creates a permanent, airtight seal. The strength difference is significant.
- Vulcanized Repair: This is a permanent solution. It is designed to last for the remaining life of the tire. It can withstand forces of 1,500-3,000 PSI.
- Temporary Plug: This is a short-term fix. Its strength is much lower. It often fails under 800 PSI.
The Tire Industry Association sets clear standards for a proper flat tire repair. A technician must inspect the tire from the inside. They fill the puncture and seal the inner liner. Your tire repair kit helps you perform a similar, robust repair. It properly fills the puncture channel, which is a key step for a reliable fix.
Saves You Time and Money
A flat tire can disrupt your entire day. You first have to wait for roadside assistance. Tow services often arrive within 30 minutes, but this wait can feel long during an emergency. Then, you must go to a repair shop. A professional tire patch costs between $20 and $50. This is the best-case scenario.
If the damage is severe or you drive too far on the flat, you may need a new tire. The cost of a new tire adds up quickly.
| Tire Category | Price Range Per Tire |
|---|---|
| Economy/Budget | $65-$100 |
| Mid-range | $100-$160 |
| Premium | $160-$350 |

A quality kit allows you to perform the repair yourself in minutes. This saves you both time and money. The one-time cost of the kit is a small price for avoiding these larger expenses and delays.
Provides Peace of Mind on the Road
Being stranded on the side of the road is stressful and dangerous. Having a tire repair kit in your vehicle gives you the power to handle the situation safely and efficiently. You can avoid the biggest risks of a roadside emergency.
- You reduce the danger of being struck by other vehicles.
- You avoid the vulnerability of waiting for help in an unfamiliar area.
- You control the situation instead of feeling helpless.
This preparation is crucial for your safety. Roadside assistance professionals face these dangers daily.
In situations ranging from serious crashes to flat tires or car troubles, those who respond to roadside assistance calls put themselves at risk everyday.
Your emergency kit empowers you to get back on the road quickly. This reduces your exposure to potential hazards. The confidence that comes from being prepared for common roadside emergencies is invaluable. This kit is an essential tool for any driver’s emergency supplies.
What’s Inside the Best Tire Repair Kit?
Not all repair kits are created equal. The best tire repair kit contains high-quality tools designed for durability and ease of use. Understanding each component helps you appreciate why a good kit is a worthwhile investment. A complete tire repair kit ensures you have everything needed for a successful fix.
The Reamer Tool
The reamer tool is your first step in preparing the puncture. You use this tool to clean out debris and slightly widen the hole in your tire. This action creates a uniform channel, which allows the vulcanizing strip to bond perfectly with the tire rubber. A quality reamer in your kit makes this job much easier.
- Strong Materials: Look for tools made from high-grade stainless steel or carbide. These materials resist bending and breaking under pressure.
- Ergonomic Handle: A T-handle design gives you a firm grip and better leverage, so you can clean the puncture with less effort.
The Insertion Tool
The insertion tool, sometimes called a needle tool, pushes the vulcanizing strip into the prepared hole. A well-designed tool is crucial for a successful repair. An ergonomic T-handle provides superior turning power and control. This feature allows you to insert the plug smoothly without damaging the tire or the strip, making it more reliable than a basic tire plug kit. This tool in the kit is essential for a proper seal.
Vulcanizing Strips
Vulcanizing strips are the heart of your tire patch kit. These sticky, black rubber strings are not just simple plugs. They are made from a special chemical compound designed to react with rubber cement and your tire. This chemical reaction, called vulcanization, permanently fuses the strip to the tire.
Did you know? The strip’s unique composition allows it to create a permanent, airtight seal. Key ingredients include:
- Elastomers: Natural or synthetic rubber that forms the strip’s body.
- Sulfur: The essential element that creates strong cross-links with the tire’s rubber.
- Accelerators & Activators: Chemicals that speed up the bonding process, ensuring a fast and secure seal.
This advanced formula makes the repair a permanent part of your tire.
Rubber Cement (Vulcanizing Fluid)
The rubber cement in your tire repair kit is not ordinary glue. It is a powerful chemical agent called vulcanizing fluid. This fluid is the catalyst that starts the permanent bonding process for your tire. You apply it to the reamed puncture and the vulcanizing strip. The fluid cleans the surface and prepares the rubber of your tire for a chemical reaction.
Pro Tip: Always apply a thin, even layer of vulcanizing fluid. Too much can slow down the curing process, while too little may result in a weak bond for your tire.
This special fluid creates a much stronger connection than standard adhesives. It works by causing a chemical change that fuses the repair strip directly to your tire. The table below shows you the key differences.
| Feature | Vulcanizing Fluid (Cold Vulcanization) | Standard Rubber Cement |
|---|---|---|
| Bond Type | Chemical (covalent) bond via sulfur cross-links | Mechanical bond via tangled polymer molecules |
| Process | Breaks and reforms sulfur bonds in existing rubber; forms new cross-links with patch | Polymer molecules in solvent tangle as solvent dries |
| Strength | Stronger bond | Generally weaker bond |
| Chemical Change | Involves chemical reactions (reduction and reformation of disulfide bonds) | No new chemical linkages (covalent bonds) formed |
The chemical bond is what makes this repair so reliable. The best tire repair kit includes high-quality fluid to ensure this process works perfectly. When you use this kit, you are not just plugging a hole; you are rebuilding that section of the tire. The components in this kit work together to create a seamless seal. This is why a good tire repair kit provides a permanent fix. The entire kit is designed to restore the integrity of your tire.
How to Use Your Vulcanizing Tire Repair Kit: A Step-by-Step Guide
Knowing how to use a tire repair kit can turn a stressful situation into a manageable task. This guide will walk you through the process, giving you the confidence to perform a safe and effective repair. Your vulcanizing tire repair kit contains everything you need to get back on the road.
Step 1: Locate and Prepare the Puncture
Your safety is the top priority. Before you even look at the tire, you must secure your vehicle and yourself.
Roadside Safety First! ⚠️ Never attempt a tire repair on a busy highway or in heavy traffic. Call for professional assistance in those situations. For all other cases, follow these critical safety steps:
- Pull your vehicle completely off the road to a level, stable area.
- Turn on your hazard lights immediately.
- Engage your parking brake to prevent the car from rolling.
- Place wheel wedges behind the other tires for extra security.
- Ensure all passengers are safely away from traffic, ideally behind a guardrail.
Once you are safe, you can find the leak. Sometimes the cause of the puncture, like a nail, is obvious. If not, you can use a few simple methods to find it.
- Visual Inspection: Carefully look over the entire tire tread for any screws, nails, or other sharp objects.
- Soap and Water Solution: Mix dish soap and water in a spray bottle. Spray the solution all over the tire tread. You should watch closely for bubbles forming, which will pinpoint the exact location of the leak.
- Water Submersion: If you can remove the wheel, this is a very effective method. Inflate the tire and submerge it in a large tub of water. A stream of bubbles will show you exactly where the air is escaping.
After you find the object, use pliers from your tool kit to pull it straight out of the tire. Be ready for a hissing sound as more air escapes.
Step 2: Ream the Hole for a Clean Surface
This step is essential for a successful repair. You will use the T-handle reamer tool from your tire repair kit to clean and shape the puncture channel. This prepares the surface for a strong chemical bond.
Insert the reamer tool into the hole. You may need to apply significant force to push it in. Once it’s in, work the tool briskly in and out while twisting it. This action removes rubber debris and roughs up the inner surface.
Did you know? You might feel and hear the reamer scraping against the tire’s steel belts. This is normal. The tool is designed to push the steel strands apart, not cut them. This process creates a clean, uniform channel for the repair strip.
Continue reaming until the tool moves in and out smoothly. A properly prepared hole ensures the vulcanizing strip will create a perfect, airtight seal. This is a key part of the repair process.
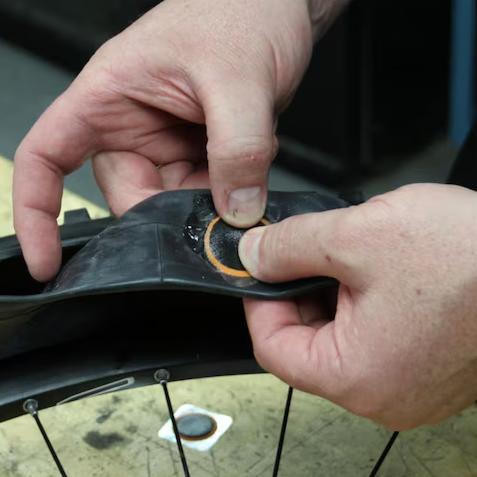
Step 3: Apply Cement and Insert the Vulcanizing Strip
Now you will use the core components of your kit to seal the tire.
- Thread one vulcanizing strip through the eye of the insertion tool. You should pull it through until the strip is centered in the tool.
- Open the rubber cement (vulcanizing fluid). Apply a generous layer of the fluid to the vulcanizing strip, coating it completely.
- Push the tip of the insertion tool straight into the prepared hole in the tire. You will need to use firm, steady pressure. Push until only about half an inch of the strip is left sticking out of the tire.
- Hold the base of the tool against the tire and pull the handle straight up with a quick, firm motion. The tool will slide out, leaving the strip inside to seal the puncture. The design of the kit’s insertion tool prevents the strip from being pulled out.
The chemical reaction between the fluid, the strip, and your tire begins immediately, creating a permanent bond. This is why this type of repair is so reliable.
Step 4: Trim the Excess and Inflate Your Tire
You have successfully sealed the puncture. This final step completes the repair and gets your vehicle ready to move. Knowing this part of how to use a tire repair kit ensures your repair is clean and your tire is safe for the road.
The vulcanizing strip is now firmly bonded inside your tire. You will see the two ends of the strip sticking out from the tread. You need to trim this excess material. Use a sharp utility knife or the cutting tool included in your kit. Cut the strip flush with the surface of the tire tread. A clean cut prevents the plug from catching on the road and pulling loose.
Pro Tip: Be careful not to gouge the surrounding tire rubber when you trim the plug. A steady hand and a sharp blade will give you the best result. The goal is to make the repair area as smooth as possible.
Once you trim the plug, the next question is about waiting time. The chemical vulcanization process works quickly. Many experienced users report their own successful methods.
- Some drivers inflate the tire to full pressure immediately after trimming the plug.
- They have done this many times without the repair ever failing or coming loose.
The strong chemical bond forms very fast. You can now re-inflate your tire. Use a portable air compressor to fill the tire to the manufacturer’s recommended pressure. You can find this information on a sticker inside your driver’s side doorjamb or in your owner’s manual. Do not over-inflate the tire.
After inflating the tire, perform one last check. Spray your soap and water solution over the repair area one more time. Watch for any new bubbles. No bubbles means you have a perfect, airtight seal. Your tire is now permanently repaired and ready for the road.
When to Use a Tire Repair Kit (And When Not To)
A vulcanizing tire repair kit is a powerful tool, but you must know its limits. Using the kit correctly ensures a safe and lasting repair. Understanding where and when to perform a repair is crucial for your safety on the road.
Ideal for Tread Punctures
Your tire repair kit is designed for small punctures in the tread area of your tire. The tread is the flat part of the tire that makes contact with the road. Common objects like nails, screws, and sharp pieces of glass or metal often cause this type of damage. The kit works best on a straight-in puncture.
Important Size Limits You should only attempt a repair if the puncture meets these industry guidelines:
- The hole is no larger than ¼ inch (6mm) for passenger car tires.
- The hole is no larger than ⅜ inch (10mm) for steel-belted truck tires.
A repair within these limits allows the vulcanizing strip to create a strong, permanent seal.
Do Not Repair Sidewall or Shoulder Damage
You must never use a tire repair kit on the sidewall or shoulder of a tire. The shoulder is the curved area where the tread meets the sidewall. These parts of the tire flex constantly while you drive. A plug or patch cannot hold securely in these high-stress areas.
Engineers have shown that a repair in these zones is extremely unreliable. The constant bending can cause the patch to detach, leading to sudden air loss. Attempting a repair on the sidewall is as dangerous as risking a full blowout while driving. This type of damage always requires a new tire.
Avoid Repairing Large Gashes or Tears
This kit is made for a simple puncture, not for large cuts, gashes, or tears. If the damage is a long slice or if you can see the tire’s internal cords or plies, the tire is beyond repair. This kind of severe damage compromises the entire structure of the tire. A plug cannot fix this level of structural failure. Driving on a tire with such damage is incredibly unsafe. You must replace the tire immediately to avoid a catastrophic failure.
A vulcanizing tire repair kit is an essential tool for any driver. This kit empowers you to handle a flat tire during roadside emergencies. Keeping a high-quality tire repair kit from a trusted manufacturer like SUNSOUL in your vehicle prepares you for a puncture. This small investment prevents the stress and cost of unexpected roadside emergencies. A proper repair is critical for your safety.
Safety Note from NHTSA ⚠️ The National Highway Traffic Safety Administration (NHTSA) only sanctions one method for a safe tire repair: a combination plug and patch. Your emergency kit helps you perform the crucial first step of this repair process. This emergency kit is a vital part of your emergency supplies.
FAQ
How is a vulcanizing kit different from a standard tire plug kit?
A standard tire plug kit provides a temporary fix. It just plugs the hole. A vulcanizing kit creates a permanent chemical bond. The repair fuses with your tire’s rubber. This makes the repair much stronger and more reliable for long-term use.
Is a vulcanizing repair really permanent?
Yes, a vulcanizing repair is permanent. The chemical process creates a seamless, airtight seal that becomes part of the tire itself. You can drive on this repair for the remaining life of the tire, provided the initial damage was within the repairable limits (a puncture under ¼ inch).
How soon can I drive after making a repair?
You can drive almost immediately after the repair. 🚗 Once you trim the excess plug and inflate the tire to the correct pressure, the chemical bond is strong enough to handle driving. Always double-check for leaks with soapy water before you go.
What makes for the best tire repair kit?
The best tire repair kit includes high-quality tools and materials. Look for a kit with strong steel tools, fresh vulcanizing fluid, and quality rubber strips. A complete tire patch kit ensures you have everything needed for a successful and lasting repair.